Creating your own LogMX Manager
(to handle a new log data source)
Page summary:
|
Useful links:
|
Introduction
LogMX uses Log Managers to read the bytes that will be sent to the Parser in order to
extract log entries.
Each Manager is able to read bytes through a specific protocol: one will be able to read from a file
on your hard disk, another one from a website (HTTP), another one from SFTP, and so on. LogMX comes with
several default Managers:
LocalFileManager to read files from your local disks/mediaLocalDirectoryManager to read entire directories from your local disks/media (several files, defined by a filter, merged in a single view)SFTPFileManager to read files from SFTPSFTPDirectoryManager to read entire directories from SFTP (several files, defined by a filter, merged in a single view)FTPFileManager to read files from FTPFTPDirectoryManager to read entire directories from FTP (several files, defined by a filter, merged in a single view)FTPSFileManager to read files from FTPSFTPSDirectoryManager to read entire directories from FTPS (several files, defined by a filter, merged in a single view)SMBFileManager to read files from CIFS/SMB ("Samba")SMBDirectoryManager to read entire directories from CIFS/SMB ("Samba") (several files, defined by a filter, merged in a single view)SCPFileManager to read files from SCPSocketManager to read from TCP/UDP socketsHTTPFileManager to read files from HTTP web serversHTTPSFileManager to read files from HTTPS secured web serversHTTPServerManager to receive log entries through HTTP (using a small embedded web server)HTTPSServerManager to receive log entries through HTTPS (using a small embedded web server)SerialCommManager to receive log entries through Serial Ports (e.g. "COM1", "ttyS0", "/dev/ttyS0", ...)ElasticSearchManager to read log entries from ElasticsearchSampleHTTPManager which is a simplified version of HTTPFileManager, coming with its full source code:
this Manager is an example of how to write a Manager, its Java source file and class can be found in "managers/" directory of your LogMX distribution
LogMX knows which Manager to use to open a resource thanks to the URL the user specified (or simply because
the user chose this Manager in "Open" dialog box).
This page deals with creating your own Manager: you can implement a LogMX Manager by writing
only one Java Class. Then compiling this class file in a dedicated LogMX folder will allow you
to use this Manager, the same way you use the default Managers.
 Eclipse development environment
- Project import
In Eclipse, click on "File" menu, then "Import". Choose "General" > "Existing Projects into Workspace" in the dialog box
and click on the "Next>" button.
Click on the "Browse" button (in the upper right corner) and select LogMX directory before clicking the "OK" button.
You can unselect "LogMX Parsers" if you don't want to write LogMX parsers (see parser dev).
Then click on the "Finish" button.
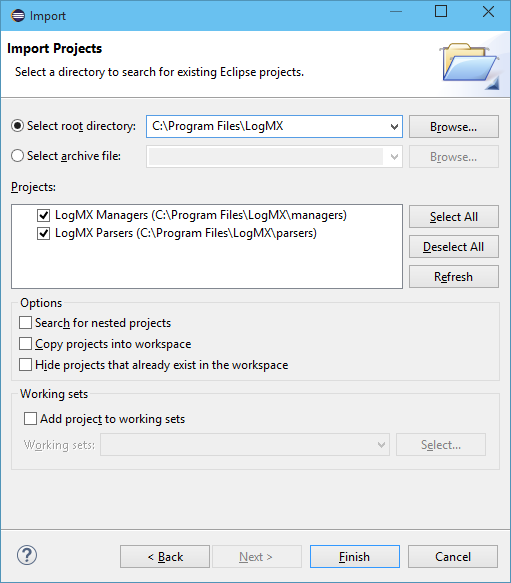 Eclipse project import Eclipse project import
- Project configuration (Jar file path)
In the "Package Explorer" view (usually on the left), right click on the new project "LogMX Managers", and select
"Properties". In the new dialog box, choose "Java Build Path" on the left, and go to the "Libraries" tab.
Double-click the line "LOGMX_HOME/jar/logmx.jar".
[LogMX v5.3.3 or older]: Click on the
"Variable" button, then the "New" button. In front of "Name", type "LOGMX_HOME", then click on the "Folder" button
to choose your LogMX directory (e.g. "C:\Program Files\LogMX"). Finally, click on "OK" buttons to go back to the
"Libraries" tab.
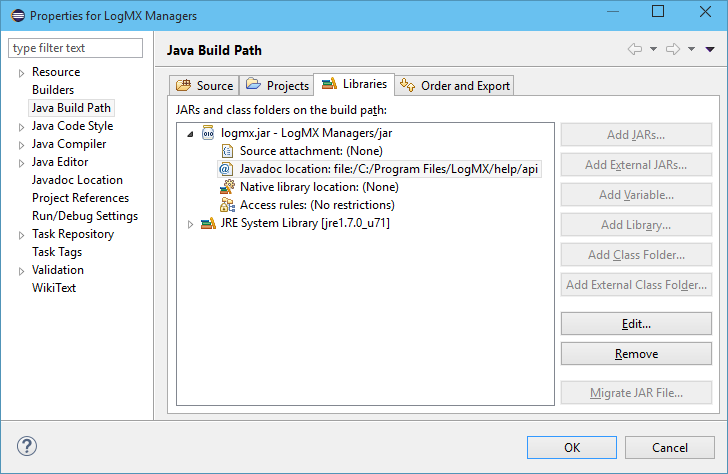 Eclipse project configuration: Build Path Eclipse project configuration: Build Path
- Project configuration (LogMX API Javadoc link)
Always in project properties dialog box, expand the item "logmx.jar" and double-click on
"Javadoc location". Click the "Browse" button and select the "help/api" directory of your LogMX distribution.
To finish, click on "OK" buttons to go back to Eclipse main window.
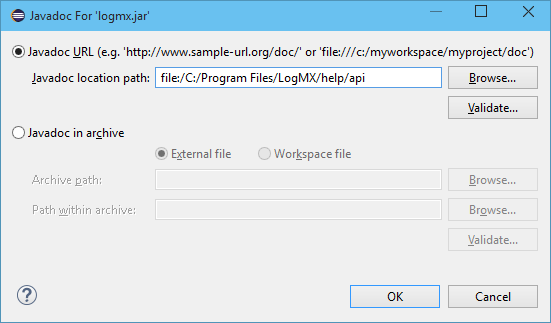 Eclipse project configuration: LogMX API Javadoc link Eclipse project configuration: LogMX API Javadoc link
- Creating your Manager
In the "Package Explorer" view, right-click on the "src" directory of your project, and then click
on the "New" > "Class" option. In the new dialog box, type a package name in front of "Package"
(e.g. "my.manager"). In front of "Name", type your Manager class name (e.g. "TestManager").
In front of "Superclass", type "com.lightysoft.logmx.mgr.LogFileManager" (or you can start typing
"LogFile" and use Ctrl-Space completion). Ensure option "Inherited abstract methods" is
checked, and then click on the "Finish" button.
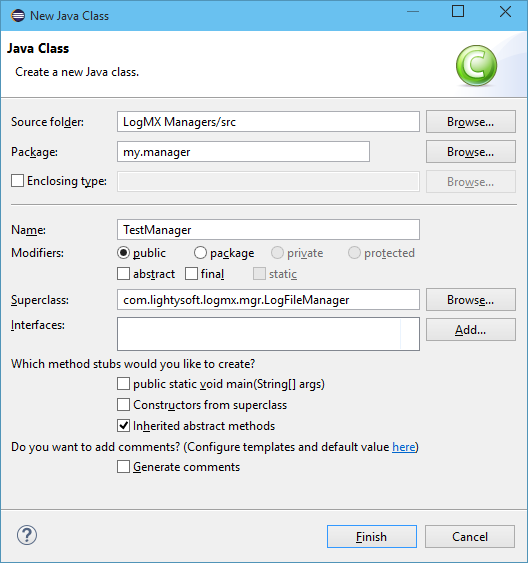 Manager class creation with Eclipse Manager class creation with Eclipse
You are now ready to implement your manager, see section Manager implementation for
more information.
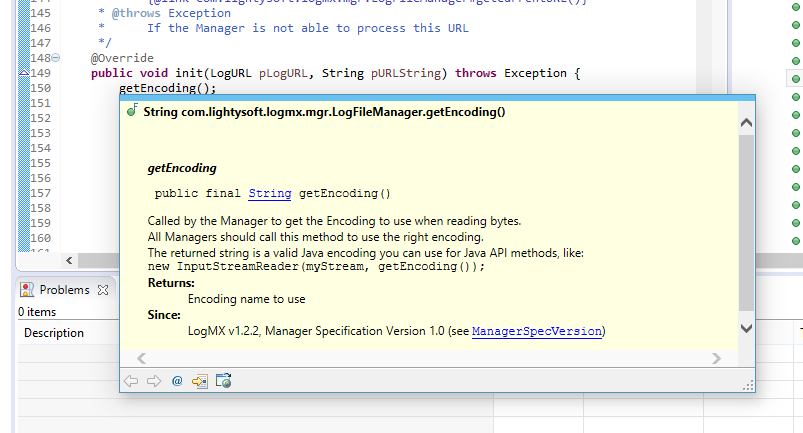 Manager development with Eclipse (here, LogMX API javadoc helping developper) Manager development with Eclipse (here, LogMX API javadoc helping developper)
You can now test your Manager in LogMX, see Manager test chapter.
 IntelliJ development environment
- Opening project
To open the IntelliJ project, you have to open the project file "intellij_managers.ipr" in the LogMX "managers/" directory
- On Windows, double-click on this project file.
- On any OS, if an IntelliJ project is already opened, use "File" > "Open". If no project is opened (i.e. welcome screen displayed)
click on "Open" option.
- Project configuration (JDK selection)
Once the project is opened, you will surely have to make it point to your currently configured JDK: at this time, IntelliJ needs a
name for the project's JDK which is specific to your IntelliJ configuration. IntelliJ project embedded in LogMX uses the name "1.7"
for its JDK: if yours is not named like this, you will need to set your JDK name in LogMX Managers project to compile it. To set your JDK,
you can go to "File" > "Project Structure" > "Project Settings" > "Project". In "Project SDK" section, choose your current JDK
(Java 8 or greater). If you don't have any JDK, you can add one now using the button "New" at the right of the JDK selection combo box.
- Creating your Manager
In the "Project" tool view (generally on the left), right-click on the "src" directory, and then click on the "New" > "Package" option,
then enter a package name for your manager (e.g. "com.mycompany.managers"). Then, always in the "Project" tool view, right-click on the package
you have just created, and then click on the "New" > "Class" option. Give a name to your class (e.g. "MyManager"), and choose the Kind "Class".
The first thing to do in your new Manager class is to add "extends LogFileManager" just after your class definition (use <Alt> + <Enter> at the end
to automatically import "LogFileManager" from "com.lightysoft.logmx.mgr").
Finally, use <Ctrl> + <I> (or menu "Code" > "Implement Methods...") to start implementing all required methods.
You are now ready to implement your manager, see section Manager implementation for
more information.
 Manager development with IntelliJ (here, LogMX API javadoc helping developper) Manager development with IntelliJ (here, LogMX API javadoc helping developper)
You can now test your Manager in LogMX, see Manager test chapter.
 Ant development environment
- Creating Manager class file
In "managers/src" directory of your LogMX distribution, create directories matching your
packages name (e.g. create "my/manager/" for packages "my.manager"). Create your Java class
source file in your package directory (e.g. file "TestManager.java" in "my/manager/").
You are now ready to implement your manager, see section Manager
implementation for more information.
- Compiling Manager class file
Open a shell in the "managers" directory of your LogMX distribution, and simply type
"ant" to compile in "classes" directory all managers present
in "src" directory.
Here is the list of all available targets: (use "ant -p"
to get it from your shell)
| (default target) |
build-dev |
Build managers for development (no optimize, all debug symbols) |
|
build-prod |
Build managers for production (optimized, no debug symbol) |
|
clean |
Remove all generated class files |
You can now test your Manager in LogMX, see Manager test chapter.
 Gradle development environment
- Creating Manager class file
In "managers/src" directory of your LogMX distribution, create directories matching your
packages name (e.g. create "my/manager/" for packages "my.manager"). Create your Java class
source file in your package directory (e.g. file "TestManager.java" in "my/manager/").
You are now ready to implement your manager, see section Manager
implementation for more information.
- Compiling Manager class file
Open a shell in the "managers" directory of your LogMX distribution, and simply type
"gradle" to compile in "classes" directory all managers present
in "src" directory.
Here is the list of all available commands:
| (default task) |
gradle |
Build managers for development (no optimize, all debug symbols) (equivalent to "gradle -P dev") |
|
gradle -P prod |
Build managers for production (optimized, no debug symbol) |
|
gradle clean |
Remove all generated class files |
You can now test your Manager in LogMX, see Manager test chapter.
 Maven development environment
- Creating Manager class file
In "managers/src" directory of your LogMX distribution, create directories matching your
packages name (e.g. create "my/manager/" for packages "my.manager"). Create your Java class
source file in your package directory (e.g. file "TestManager.java" in "my/manager/").
You are now ready to implement your manager, see section Manager
implementation for more information.
- Compiling Manager class file
Open a shell in the "managers" directory of your LogMX distribution, and simply type
"mvn" to compile in "classes" directory all managers present
in "src" directory.
Here is the list of all available commands:
| (default goal) |
mvn |
Build managers for development (no optimize, all debug symbols) (equivalent to "mvn -P dev") |
|
mvn -P prod |
Build managers for production (optimized, no debug symbol) |
|
mvn clean |
Remove all generated class files |
You can now test your Manager in LogMX, see Manager test chapter.
Manager implementation
Writing a LogMX Java Manager consists in creating a Java class that extends the abstract
class LogFileManager and implementing
its abstract methods.
To get detailed information on these methods you have to implement, see our on-line
javadoc or
read it from your LogMX distribution (under "help/api").
For a complete example of Manager implementation, see "SampleHTTPManager.java" in directory "managers/src/sample/manager"
of your LogMX distribution, or see it online: Manager class sample.
If you have any problem or question, please visit our
Manager Development Forum or
contact us.
Manager test
Here is how to test your Manager in LogMX:
-
Manager compilation
Compile your Manager to "manager/classes" (see above to compile it with Eclipse/IntelliJ/Ant/Gradle/Maven).
NOTE: If you have several versions of Java installed, be sure to run LogMX with a Java version greater
or equal to the version of the compiler you use to compile your Manager (you can run LogMX with
Java 9 to use a Manager compiled with Java 8, but you cannot run it with Java 8 to use a Manager
compiled with Java 9).
To get the version you use to run LogMX, go to "Help" menu, "About" option, and click on the
blue "i" icon in the left bottom corner: version is specified in front of property "java.version"
in the upper table.
To get the version you use to compile your Manager:
• with Eclipse, right-click on your Eclipse project and select the "Properties" option.
Then click on "Java compiler" in the left pane.
• with IntelliJ, right-click on your IntelliJ module ("Project" tool view) and select the option
"Open Module Settings". Then click on "Dependencis" tab.
• with Ant/Gradle/Maven, check your JAVA_HOME environment variable.
If you don't have such a variable, check the JDK directory of your PATH
environment variable: type "java -version" in your shell to get this Java version.
-
Manager installation
In the "Tools" LogMX menu, click on "Options...". In the dialog box that appeared, go to the "Managers" tab
and click on the green "+" button on the right. In the new dialog box, select your Manager class in the main tree
(as you can see in this dialog box, you can add Managers included in a Jar file).
Of course, you have to do this only once, then LogMX will use this manager if needed.
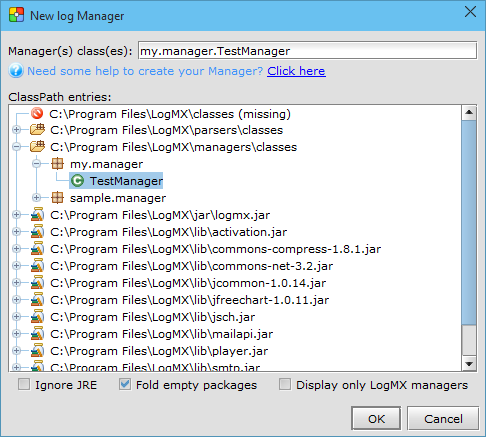 Manager installation in LogMX Manager installation in LogMX
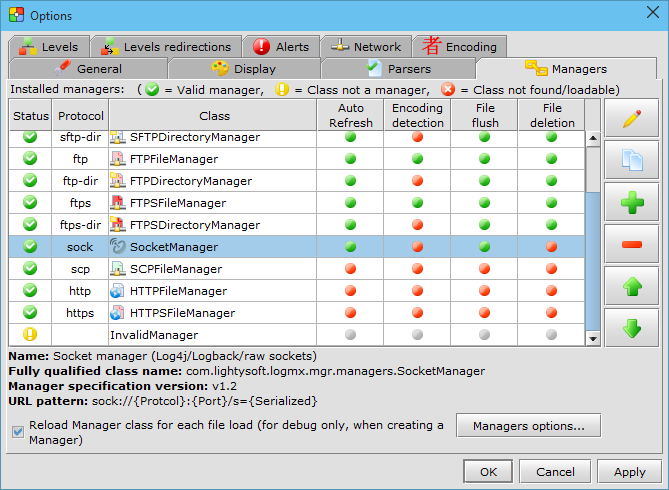 Manager configuration in LogMX Manager configuration in LogMX
-
Manager test
To test your manager, click on "File" menu, "Open" option, and select its name in the upper combo box. Then
fill the form that describes the resource you want to open with your Manager.
You can also type a URL in the upper address bar of LogMX main window (this URL must begin with your Manager
protocol, like "jdbc://" for example).
If you recompile your manager, you will have to restart LogMX to use the last version of your manager
(Java stores your Manager class file in a cache for better performance). To open your log file directly at
LogMX start-up, you can put its filename in the LogMX command-line arguments (or drop your log file
on the LogMX executable).
|
|
 Eclipse development environment
 IntelliJ development environment
 Ant development environment
 Gradle development environment
 Maven development environment
 Eclipse development environment
 IntelliJ development environment
 Ant development environment
 Gradle development environment
 Maven development environment


